14 July 2009

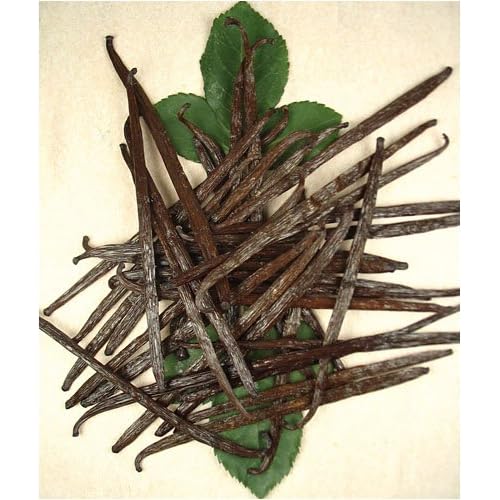
Vanilla Bean Sale


If you're in the market for vanilla beans, look no further than Amazon.com's grocery section. I never would have thought to look for them on Amazon, but the prices are great and I've heard from several people who have ordered them and been extremely pleased with the quality of the product. I'm really looking forward to attempting Vanilla Bean Ice Cream and other delicious vanilla-y treats once I receive my order!

**The photo above came from the Amazon link in this post**

13 July 2009

Chocolate Peanut Butter Banana Smoothie


I love to try new things, and when Kristi and I wandered through the Natural Foods section of Stop & Shop yesterday, I saw something that I just had to experiment with - chocolate hemp milk.

Hemp milk is made using the seeds of the hemp plant. It's a delicious alternative for vegans, since they do not consume dairy products. The Global Healing Center explains the benefits of choosing hemp milk, including lots of Omega-3 and -6 fatty acids, protein, potassium, and tons of vitamins and minerals. They also have directions for making your own organic hemp milk, which is definitely a step farther than I'm interested in going at this time.
I made an amazing smoothie with the chocolate hemp milk - you could definitely use regular milk, chocolate milk, chocolate soy milk, etc. to get a very similar effect.


Chocolate Peanut Butter Banana Smoothie

1 banana, cut into chunks and frozen
1 tbsp. peanut butter
1/2 c. chocolate hemp milk

Blend all ingredients until smooth. If mixture is too thick, add more chocolate milk. If mixture is too thin, add banana or ice cubes.


This smoothie is so decadent - it would be great for dessert or as a meal replacement. The chocolate hemp milk and peanut butter make it rich and creamy, and the fresh banana flavor prevents it from being too sweet. If you aren't feeling adventurous enough to try chocolate hemp milk, definitely make the smoothie with your own favorite kind of chocolate milk.

06 July 2009

Hummingbird Nectar


We love our hummingbird feeder. We have two hummingbirds that come to the feeder, which hangs right outside our kitchen window. In this photo, you can see the green door that leads into our laundry room, so we have two vantage points from inside the house. There is also a chair in the corner of the front porch, almost under the feeder, and our hummingbirds have been known to come eat while Andrew and Finn are sitting right under it! We are still working on getting a great shot of them feeding - they come and go so quickly!

We make your own hummingbird nectar and replace what's left in the feeder every week or so. Just rinse the feeder with hot water. If it gets sticky, moldy, or dirty, you can wash it with white vinegar (don't use soap, as any residue may be harmful to the birds).

Hummingbird Nectar

4 parts water
1 part sugar

Whisk water and sugar together in a saucepan (I usually use 4 cups water, 1 cup sugar) and bring to a boil. Remove pan from heat and allow mixture to cool. Store any extra nectar in the refrigerator.


You can buy a feeder for $10-$15, make the food yourself, and in no time, you'll have hummingbirds flocking to your yard too!

Garbage Bag Caesar Salad


My step-mother-in-law, Ann, has several signature dishes. One that Andrew and I both adore is her garbage bag Caesar salad. It's a simple recipe that always comes out yummy, and the um, unconventional method is a great conversation starter!


Ann's Garbage Bag Caesar Salad

1 large head romaine lettuce (or 2 hearts of romaine)
5-8 oz. shredded Parmesan cheese
Caesar salad dressing (Ann likes Wishbone!)
croutons
1 clean garbage bag

Wash lettuce and lay leaves on paper towels, pat dry. Tear or cut leaves into bite-size pieces. Place lettuce and cheese in garbage bag, add dressing to taste. Knot garbage bag, shake salad to mix, and store in fridge about 30 minutes. When you're ready to serve, empty bag into serving bowl and toss with croutons.


Andrew and I were trying to save money, so we made ours in a Giant Eagle grocery store bag, but hey, it worked! We did double up the bag for the tossing of the salad, just in case. I definitely recommend using shredded cheese rather than grated - the larger pieces of cheese stand up to the dressing better.

A co-worker of ours once attempted the salad but couldn't figure out why it smelled and tasted sort of...off. Ann quizzed her on the brands of cheese and salad dressing, whether she washed the lettuce, etc. Somehow, Ann was able to figure out that our friend had made quite the mistake - she had tossed the salad in a scented garbage bag! No wonder her salad had an interesting aftertaste of lavender and chemicals!

Save for the rare error in garbage bag selection, this salad is easy to put together, a guaranteed hit, and just as fitting for weeknight meals as it is for fancier weekend dinners.

05 July 2009

Garlicky Crescent Rolls

I must admit, I occasionally rely on dough that comes in tubes. I like to dress them up so they're not quite so plain.


This time, I took crescent rolls, spread them with butter, and sprinkled with garlic salt, Italian seasoning, black pepper, and parsley. Then I just rolled them up and baked according to the package directions.


These garlicky crescent rolls are a little nicer than just slapping the dough out of the tube, without taking any more time or effort. I like to have bread with my meals and this is an easy way to make that happen!


30 June 2009

Happy Anniversary to ME!

Sunday was our first wedding anniversary! We spent the weekend camping in Oil Creek, Pennsylvania, and it was a wonderful getaway.


On the evening of our anniversary, we sat at the picnic table at our campsite and toasted, drinking our champagne out of plastic cups. Our wedding cake spent the year in my Nonnie & Papa's freezer, then flew from CT to Ohio with me last Thursday, then spent the weekend in its own little cooler until we were ready to eat it on Sunday. It wasn't much worse for the wear:


The beautiful seashells are solid white chocolate, and the cake is a dark chocolate cake with peanut butter mousse (Andrew's pick!) with a white chocolate frosting.
I have lots of great camping recipes to post, but for now, here are some pictures of our wedding day, one year ago!

24 June 2009

Chocolate Covered Strawberries

My family all adore chocolate covered strawberries, so we make them several times a year for various functions. Whenever I receive solid chocolate as a gift and can't eat it, I save it to chop up and dunk strawberries in! You may say, how do you have so much chocolate you can't eat it? That's crazy talk! To you I say, would you have eaten the eight pounds of Easter bunnies I received last year?


Chocolate Covered Strawberries


Obviously, you're going to need chocolate and strawberries. The quantities leave plenty of room for error - you'll need to find what works for you, based on the size of your strawberries and how thickly you coat them in chocolate. I used about 1.5 pounds of chopped chocolate bunnies to two quarts of strawberries (maybe it was three? I'm pretty sure it was two).

Set up a double boiler - a saucepan with an inch or two of water in the bottom, topped with a bowl that can sit on top without touching the water.

Dump your chopped chocolate in the bowl and bring the water to a simmer over medium heat. Constantly stir the chocolate, adjusting the heat as necessary to allow for slow, smooth, even melting. (Tip: Do NOT allow any water to touch the chocolate. This will cause it to seize, and once that happens, it's awfully tough to fix.)

Once the chocolate has melted, dip the strawberries. I find the best way to do this is to grip the stem/leaves and dunk the strawberry. If the chocolate is not deep enough to dunk, lay the strawberry on its side at an angle and rotate it to coat all sides.

Cool the strawberries on cookie sheets covered in waxed paper. I often cool and store mine in the refrigerator so they harden faster. If it's warm and/or humid, you will need to do this, and be very careful transporting them, as they melt and fall apart quickly in this type of weather.

If you want to decorate them further, you can try the following:
-Drizzle with a contrasting melted chocolate (white, dark, colored candy melts)
-Sprinkle with finely chopped contrasting chocolate
-Sprinkle with shots/sprinkles/jimmies (or whatever you call 'em in your neck of the woods!)
-Brush with pearl dust
-Sprinkle with cake glitter

If you have other ideas for fun decorations, please leave them in the comments!

**A special thanks to Auntie Jody for emailing me the pic from her camera!!!**

Celebrity Sighting


I understand this has absolutely NOTHING to do with food, but I wanted to share my excitement. Kristi's boyfriend Robbie ran into Neil Patrick Harris on the street in NYC a couple weeks ago. I adore NPH, so I was disproportionately thrilled to receive this photo. That's all for now, folks!

16 June 2009

Throw Together Pasta: Version 1


I make a lot of pasta, and when I use a recipe, I always try to post it with photos. What you don't get to see, dear readers, is the behind-the-scenes magic that occurs when it's 5:30 on a weeknight, I'm starving, and I've already put on my pajamas. In these situations, there's only one thing to do - make something happen for dinner using only the contents of my pantry.

This may be an acquired skill, but it is certainly something I'm excellent at. I've decided to try to start sharing my pantry meals with you, in the hope of inspiring last-minute greatness at your dinner table.


Throw Together Pasta: Version 1
The Veggie Version
Co-Chef: Kristi

Pasta

1 lb. pasta (whatever you've got!)
1 sweet potato, julienned
1 ear leftover corn on the cob, kernels removed
1 medium zucchini, julienned
1 medium onion, sliced thin
5 cloves of garlic
red pepper flakes
EVOO


If you aren't good at chopping or you are lazy and don't have the energy to hunt for your mandolin, feel free to roughly cut the veggies into chunks about the same size as the pasta you've chosen. We almost always have penne rigati or rigatoni, and I like to keep everything in the dish as uniform in size as possible.

Bring a large pot of water to a boil, add a handful of salt and the pasta. Cook according to the al dente timing on the box.

In a large pan over medium heat, saute onions and garlic in EVOO until soft. Add sweet potato and cook until it begins to slightly soften. Add the corn, zucchini, and red pepper flakes. Continue to saute veggies until all are heated through and slightly softened, not mushy.

After your pasta is cooked and drained, return it to the large pot. Pour the veggies and pesto over the pasta, toss to combine. Top with any grated/shredded cheese you've got on hand.


Pesto

herbs from your best friend's garden (we had a large fistful each of parsley and chives)
2 cloves garlic
small handful of raw walnuts
salt, pepper, EVOO
splash of cream

You can make this ahead of time if you must, but part of what makes this pesto so great is that it's fresh. This is "throw together pesto" - so you're using what's on hand...NOT going to the store to buy pignoli (pine nuts) or spending $5 on basil because it's not fully grown into your garden yet.

I used my rocket blender to make this, but feel free to utilize your food processor or full size blender. Stuff the herbs into the blender, add raw garlic, walnuts, and about 2 tbsp. olive oil. Pulse pesto until it isn't moving anymore - now you need to add more EVOO. If you have a regular full size blender or a large food processor, you can stream in the oil, otherwise, you will have to stop, add more, check it, and repeat until you get the right consistency. Once the pesto is fully combined, add a lovely splash of cream to loosen it up a bit more and make it a bit richer.

Variaions
-If you want this meal to be vegan, just omit the cream in the pesto and don't top your pasta with cheese
-If you want this meal to fall into a raw diet, steam all the veggies and serve over quinoa, smothered with pesto (since it's a raw sauce)


This pasta turned out great. Kristi and I loved the kick from the red pepper on the veggies and the raw garlic in the pesto. The sweet potato added a lot of body to the dish, the corn added crunchy freshness, and the zucchini was a bright pop of color and clean flavor. You could add curry powder in place of the red pepper if you wanted to give it an Indian twist - curry would mesh really well with the sweet potato.

The point of my throw-together pastas is to try new combinations and not let anything go to waste. Basically, incorporate all your leftover meats and veggies, and make up a sauce that works. If you know the methods for simple sauces, you can create anything you want based on what's in your pantry. I've got another version waiting in the wings (hey, I make it a lot!) so keep your eyes peeled.

09 June 2009

Rocky Road Bars


I receive a lot of cookbooks as gifts. I am an avid reader, and somewhat of a book collector, so a new book is always a welcome present, especially one with pictures of beautiful food.


Someone gave me the Betty Crocker cookbook Simply Dessert, and the first recipe I chose to make was the one for Rocky Road Bars. Funny, it wasn't because I was particularly in the mood for them, but because I had all the ingredients on hand. The extent of my laziness is revealed!

Rocky Road Bars

1 box chocolate fudge or devil's food cake mix
1/2 c butter or margarine, melted
1/3 c water
1/4 c packed brown sugar
2 eggs
1 c + 1/2 c. chopped peanuts
3 c mini marshmallows
1/3 c. chocolate frosting
colored candy pieces (optional)


Preheat oven to 350 degrees. Lightly grease or spray a 13x9 pan.

In a large bowl, combine half the cake mix, butter, water, brown sugar, and eggs and stir until smooth. Add in remaining cake mix and 1 cup peanuts, stirring to combine.

Spread mixture in pan, bake 25-30 minutes.
Remove from oven, top with marshmallows. Return to oven for 5-10 minutes, or until marhmallows are melted, puffed, and golden. DO NOT overdo this step, as the marshmallows will harden.


Microwave frosting 15-25 seconds, until melted. Drizzle over bars. Top with remaining peanuts and colored candy pieces.

Cool completely, cut into bars. (Betty says you can get 24 bars out of this pan)


The recipe above reflects the changes I made to Betty's recipe. I found that 15 minutes in the oven was WAY too long for the marshmallows (read my note above). Also, I added colored candy pieces - the bars were for a co-workers birthday, and I wanted them to include her favorite colors.
All in all, the bars are very good - not nearly as dense as brownies, yet not as airy as cake. They have some fluffiness to them, but still taste rich due to all the toppings. I've never been a huge rocky road fan, but after making these bars, I may just be converted!