26 January 2010

Ham, Brie, & Green Apple Panini with Homemade Potato Chips


While Andrew and I were saving for our wedding, I got a waitressing job to help out with expenses.  I ended up meeting some amazing people and eating some fantastic food.  The Grill was a really great restaurant with a focus on good food and community service.  It was a small converted diner that focused on local foods, homemade everything, and bringing people together.  They even donated a percentage of their profits to a different community-based organization each month.  I was devastated when The Grill went out of business - my heart went out to the owners, and as the weeks went by after it closed, I started to realize how much I would miss the people, and of course, the amazing food.

The Cheddar Bacon Mashed Potatoes I shared with you were a favorite at The Grill, and this panini is another one.  I used to love to put in my order for a Ham, Brie, & Green Apple Panini at the end of my shift, then sit at the counter with my sandwich and a pile of sweet potato fries or homemade potato chips.  I attempted to recreate that panini, and I think I did a darn good job.  Please ignore the fact that I have a red apple in my photos - certain husbands were not listening when I said "you can eat all the fruit you want, just leave me one green apple."  So anyway, pretend it's green if you want.


Ham, Brie, & Green Apple Panini


 8 slices crusty, chewy Italian bread
1 cooked ham steak
1 Granny Smith apple
8 oz. brie cheese
2 tbsp. butter

Cut the ham to fit pieces of bread.  Press between paper towels to remove as much liquid as possible.  Slice the brie and the apple.  I prefer to leave the skin on the apple, but of course, do whatever makes you happy.

Butter one side of two pieces Italian bread.  Place the first slice, butter side down, on a hot panini press.  Top with ham, apple, and cheese.  Place second slice of bread, butter side up, on top of the sandwich.  Close the press and press down hard to "smush" the sandwich and get that classic panini shape.


You can easily cook two sandwiches at a time, on the press.  If you don't have one, you can use a grill pan on the stove - just put a heavy pan with a can in it on top of the sandwiches to press the sandwich.


I served these with an amazing new discovery - Microwave Potato Chips!  These chips are easy to make and unbelievably delicious.  I don't keep potato chips in the house anymore, so it was a nice treat to be able to make just enough for us to eat, with none leftover to tempt me during the day!

These chips get amazingly crispy and take on a "kettle-cooked" flavor.  We opted to make salt and pepper chips, which were delicious, but you try adding vinegar instead of pepper if you like.


Microwave Potato Chips
adapted from Eating Well

1 large Idaho potato, unpeeled, scrubbed
1 tsp. olive oil
1/2 tsp. sea salt
1/4 tsp. freshly ground black pepper

Use a mandolin or a very sharp knife to slice the potato into 1/8" thick rounds.

Toss to coat in the olive oil, salt, and pepper.

Spread the chips in one layer on a large microwave-safe plate.  Microwave on high 2-3 minutes.  Chips should be starting to brown.  Turn them over, the microwave on high 2-4 minutes.  Keep an eye on them - once they burn, they are pretty gross.  You may need to repeat this process to get the chips the color/texture you want.  Once they are done, remove to a serving bowl/plate and repeat the process with the remaining potato slices.


25 January 2010

*Chicago*


Andrew and I took an amazing trip to Chicago last weekend to visit our friend Dan.  We spent the weekend with Dan, his super nice roommate Phil, and Phil's awesome girlfriend Jess, and were sometimes joined by Dan and Phil's friend Brian.  I had never been to Chicago, and I loved the experience - we walked everywhere, drank way too much, and of course, ate our faces off.

I've got a lot of food to show you, so settle in.  :)

We landed at O'Hare at 8:30 on Friday night.  We headed for dinner at Penny's Noodle Shop around 10 pm - we are lots of late dinners that weekend, which suits us perfectly.  Six of us ate together, but we apparently aren't very creative - we only ended up trying three menu items, as some of us ordered the same things as one another.

Jess and I had the Pad Thai, which was delicious.


Phil opted for the Thai Ravioli - homemade shrimp and pork dumplings - which looked amazing.


Dan, Andrew, and Brian all ordered the Sliced Beef, a noodle dish with soy, peanuts, and veggies.


Saturday night, the six of us who had dinner together on Friday night again got together to eat Peking duck at Sun Wah Bar-B-Que.  Sun-Wah doesn't have a website, but the Chicago Reader called it the "Best Bang for Your Buck" in Chicago.

We opted for the multi-course Peking duck dinner.  For the six of us, we opted to get one duck and supplement it with sides.  Here's a photo of Laura (our chef and co-owner of the restaurant) carving the duck tableside.


I think I saw her take at least twenty ducks to task while we were eating.  She was amazing! 


We got a beautiful plate of duck...


...plus egg rolls, bok choy, steamed rolls for duck sandwiches, fresh veggies...


...duck fried rice, duck soup, chow fun, hot tea, and fortune cookies for dessert.


I'm full again just thinking about it.

On Sunday, Dan took Andrew and I to Pho 777 for brunch.  You may think pho (a Vietnamese soup made with noodles and a fragrant broth) is a weird dish to eat as your first meal of the day, but if you're at all hungover, try it.  You'll thank me.  And really, you should be thanking Dan, because it was his advice.

A picture from our train stop. 


We were seated in a semi-private back room, which was perfect, because we were able to slurp our pho and I was able to take photos!  The condiments that come with pho are truly amazing.  The red bottle is sriracha sauce, next to it is hoisin, then two types of soy sauce.  Across the front of the condiment tray are various chili sauces.  The plate in front has bean sprouts, jalapenos, and two types of basil.


We opted for an appetizer of spring rolls - each one had three large shrimp in it, was wrapped in rice paper, and was served with a peanut sauce. 


 Below is my pho - lots of basil, torn up to release the flavor, delicious noodles, thin slices of beef that were still cooking when they hit the table.  The combination of spice and steam are a great remedy for a headache (or your sinuses!) and it tastes fantastic too.


After brunch, Dan took us to a Thai grocery store.  I had a blast browsing the aisles, but I didn't want to draw too much attention to myself by taking pictures.  I did photograph the haul I brought home though.  Check it out!


From the top left clockwise, I got a box of jasmine tea bags, a marble mortar and pestle, a box of loose green tea, a bag of star anise, a packet of seasoning for rice/veggies, and a pound of ground white pepper.  I paid $15 cash for all that stuff!  If I had access to this store all the time, you can bet I'd be shopping there often!

Next, we headed into downtown Chicago.  We wandered up and down the famed Michigan Avenue - a shopping mecca.  We checked out some of the historic buildings, walked all over the place, and had a pretty fantastic day. 

Light peeking through the buildings over the Chicago River.


Sunshine on the Wrigley Building.


We met up with Phil and Jess for some drinks - Mother Hubbard's was a fun sports bar where we ate chips, watched football, and drank beer.  They had some fun sports trivia worksheets that Jess and I tried valiantly to fill out while the boys gave half-hearted answers.  Here's our group.


For dinner on Sunday night, Dan took Andrew and I to Tango Sur.  If you're still with me at this point in what may be my longest post ever, let me tell you something.  If you ever go to Chicago, any part of Chicago (and it's a sprawling city), you MUST somehow get yourself to Tango Sur for dinner.  Though the card I grabbed from the restaurant listed a website, I'm having a tough time finding it online.  You can check out this info instead. 

Basically, Tango Sur is a small, dark, super-romantic Argentine steakhouse.  You must show up in person to put your name in, and the doorman will call your cell phone in an hour.  Or two.  Or longer.  Yes, people wait that long for a hunk of beef.  The picture doesn't do it justice, but after an hour of waiting for our phone call (we were seated at 9:45 on a Sunday night) and another hour of waiting for our entree, here is the main event:


Giant, right?  We brought home leftovers.

All in all, we had a fantastic time in Chicago.  I met some fun people, got to know others better, and of course, Andrew and I got to spend quality time with Dan.  What a great city to live, work, play, and EAT in!


21 January 2010

Restaurant Review: Aha Sushi

During our trip to Chicago, I had the opportunity to meet up with some friends of mine, Rachael and Kris, who just had a baby in December.  It was so fun to hang out with them, meet the baby, and of course, EAT!  They took me to Aha Sushi in Gurnee, Illinois.  The food was fantastic and the service was superb.

First up, the appetizers!  We shared two orders of "Canon Balls" - crab meat, scallions, and cream cheese, deep fried and drizzled with blackberry sauce.  Can I just say, I could have eaten both plates by myself - these are like little balls of heaven!


We also shared an order of the Chef's Special that day - Bulgogi Rolls. Slices of bulgogi (a Korean barbecued beef) wrapped sushi-style with veggies, rice, and nori.  Delicious!


I opted for my favorite - a spicy tuna roll - then asked the waiter for a recommendation on the second roll.  He suggested his favorite, the Gurnee roll, a combination of crab meat, tempura crunch, cucumber, masago, and special sauce.  I loved them both!  In the photo below, the Gurnee roll is on the left, the spicy tuna roll on the right.


Kris's parents were out to lunch with us, and his mom opted for the Chicago Roll - a combination of cooked shrimp, crab meat, avocado, masago, cucumber, tempura crunch, and special sauce, with a drizzle of unagi sauce. 


As a non-raw fish eater, Rachael chose the Beef Udon, which looked really good!  She had a ton leftover to take home with her.


Kris and his father both got the same thing - the Sushi & Sashimi Combo.  It was a beautiful array of food!


I didn't get a picture of our dessert, but if you go to Aha Sushi's website, you can see it in the slideshow on the main page.  Basically, it was ice cream wrapped in a shell of crushed rice.  The texture of the shell was really odd - Rachael and I were not big fans.  Everyone at the table got one, half of us chose mango, half got strawberry.  Kris's dad skipped dessert due to his ulterior motive - unchallenged baby-holding time!  Luckily, we went back to Rachael and Kris's house and I got to hold the baby for a while too.  What a cutie, huh?


All in all, we had a great experience at Aha Sushi and I would definitely eat there again anytime I get to visit Gurnee.

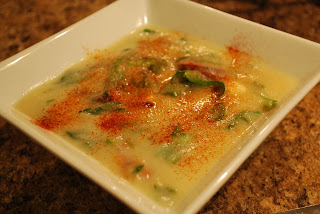
Creamy Cauliflower Soup with Andouille and Spinach


Pictures don't do this soup justice.  Smoky andouille sausage, crisp cauliflower florets, and vibrant fresh spinach combine in this rich, velvety soup that's easy enough to throw together on a weeknight.  The bonus?  It's not half bad for you!

While I was telling my mom about this soup, we got to talking about the origins of andouille.  The recipe says you can also use chorizo, which has Spanish origins, but I was only able to find the andouille.  My firmest recollection was that andouille was a "New Orleans thing" often used in Cajun cooking - gumbo, jambalaya, etouffee.  As it turns out, I was partially right - andouille has French origins and is now most closely associated with Louisiana and Cajun-style cooking.  It's a spiced, heavily-smoked pork sausage, and you can probably find it in your local grocery store. 

I opted to thinly slice the andouille on a diagonal in order to maximize the surface area.  I like a nice char on sausages, especially when they're only one component of a dish.  It's an easy way to build flavor.  What's nice about this recipe is, you get so much flavor from the sausage, onions, and cauliflower, plus the richness from the pureed potato and cauliflower mixture, that you don't need to add any butter or cream to get a creamy, hearty soup.

If you're going to make this recipe and you want to follow Sara Moulton's original, you can click through to the link.  However, I would still suggest that you read through my recipe - dear Sara leaves a few helpful hints out, and I might be able to save you some time (and dishes to wash).


Creamy Cauliflower Soup with Andouille and Spinach
adapted from Sara Moulton

2 tbsp. olive oil
12 oz. andouille sausage, sliced
1 medium onion, sliced
1 medium head cauliflower
1 medium Idaho potato
3 c. chicken broth
3 c. water
1 bunch spinach, rinsed, dried, thinly sliced
salt, pepper, paprika

Peel potato and slice thinly.  Wash cauliflower, then cut off two cups of florets.  Chop the rest of the cauliflower into small pieces.  Set vegetables aside.

In a large stockpot (use a stockpot!  not a "saucepan" as Sara suggests, unless you have one that's at least 3 quarts, in which case, you can use that), so anyway, in the stockpot, heat the olive oil over medium high heat.  Add the sausage and brown, tossing to char it evenly.  Remove with a slotted spoon and set aside on a plate.  Add the onions to the oil.  Cook until onions are tender and caramelized.

To the pot, add broth, water, chopped cauliflower (reserve the florets), and potato.  Bring to a boil over high heat, then reduce to medium-high heat and simmer for at least five minutes, or until vegetables are extremely tender. 

Transfer to blender in three batches.  I poured one third from the soup pot into the blender, pureed it, then poured into a 4-cup measuring cup.  Then I poured the second third into the blender pureed it, and poured into the measuring cup (which put me way over the 4-cup line but didn't overflow the cup).  I put the last third into the blender, emptied the measuring cup into the pot, then measured the last third and poured that into the pot.  I had about nine cups of pureed soup, due to the extra liquid in my version of the recipe (which, trust me, you'll need).

Stir reserved cauliflower florets into puree and simmer until tender (I did the 4 minutes suggested, which was a bit short, I'd add another couple minutes to that time).  Stir in chorizo and spinach, add salt and pepper to taste.  Garnish bowls of soup with a sprinkling of paprika. 


This is a healthy, hearty soup that will please everyone in your family.  The cauliflower sweetens as it cooks, imparting a mild flavor to the puree.  The color from the ribbons of spinach, the smoky andouille, and the bright paprika make this soup pleasing to the eye as well as the palate.  Add this to next week's meal plan - you won't be disappointed!

19 January 2010

Cajun Salmon Caesar Salad


When I worked in Cleveland, various people in the office would order lunch every day.  Once in a while, I'd order something, but for the most part, I brought my lunch every day.  Some of the more common take-out haunts didn't appeal to me, which was good, because it made it that much easier to resist the temptation of ordering something!  There was one restaurant that I always had to order from, and I always got the same thing:  a Cajun Salmon Caesar Salad from The Calla Club.

Andrew's uncle was the first one to turn me on to this salad, which isn't really even on the menu.  They offer a Caesar Salad, and you can add salmon to it if you choose.  Dave always ordered the salmon with Cajun seasoning, and let me tell you, Dave knows his food.  He would never steer me wrong.

The only problem with The Calla Club is that it's about 30 minutes away from me now.  It's not in a convenient location, and the times I am in the area, it's usually to go out to dinner somewhere else.  My solution?  Make Cajun Salmon Caesar Salad at home!


Cajun Salmon Caesar Salad
based on The Calla Club's version

2 pieces of salmon, about 1/2 lb. each
1/4 c. blackened seasoning*
1 tbsp. olive oil
1 large head romaine lettuce
1/2 c. shaved parmesan cheese
1 c. garlic croutons
Caesar dressing, to taste
salt & pepper

If salmon comes with skin on, carefully remove it with a sharp knife.


My salmon looked like the letter P laying on its side - one end was very thick, the other end was very thin.  I opted to fold over the flat side, break a toothpick so it would be hidden within the fish, and secure the fold.  This way, my salmon had a nice shape and was able to cook evenly.  Once cooked, you can remove the toothpick before serving, or just let everyone know it is in there.

Heat olive oil in a large skillet over medium-high heat.  Sprinkle blackened seasoning on one side of the salmon and lay that side down in the pan.  Place it carefully and do not move it.  While salmon is cooking, sprinkle the upturned side with blackening seasoning.  Repeat with second piece of salmon.  Turn after 3-4 minutes, then cook second side for another 3-4 minutes.  The salmon is done when it flakes easily with a fork.


While the salmon is cooking, cut or tear the romaine into bite-sized pieces.  Wash thoroughly and either pat dry with paper towels or spin in a salad spinner.  Toss together cheese, dressing, salt, pepper, and lettuce.  Allow to sit until salmon is ready.  Toss croutons into salad, serve with salmon.

------------------------------------------------------------------------

Blackened Seasoning*

My container of blackened seasoning is the "Market District" brand from Giant Eagle.  You can make your own using the same ingredients: paprika, salt, garlic, pepper, onion, cayenne, and thyme.  Depending on your love for spice, you can of course adjust the pepper and cayenne, sub in smoked paprika, or make any number of changes.  If you're striving for low-sodium, you can just omit the salt.


16 January 2010

Orange-Infused Roasted Green Beans


I was looking for something a little different to do with the fresh green beans I found at West Side Market last weekend, so I started searching my favorite recipe sites.  On Delish.com, I found what I was looking for: a simple recipe that only called for ingredients I already had on hand.  Andrew and I both really liked these roasted green beans.  The citrus combined with the spice from the red pepper flakes was an interesting juxtaposition of flavor, and definitely something different than our usual steamed green beans. 


Orange-Infused Roasted Green Beans
from Delish.com

1 lb. green beans, washed and trimmed
1 red bell pepper, sliced thinly
zest of 1 orange
1 tbsp. olive oil
1/2 tsp. salt
1/3 tsp. red pepper flakes

Preheat oven to 450 degrees.  Combine vegetables and oil on the baking sheet - toss to combine.  Add salt, pepper, and zest and use tongs to toss to coat.

Roast 10-12 minutes, until beans are tender with a slight char.


I roasted the full 15 minutes the original recipe calls for, and I was rewarded with some blackened beans.  I'd cut back by a few minutes and check them around 10 minutes next time!

15 January 2010

Restaurant Review: B Spot


I'm a big fan of Michael Symon - you may know him as the first winner of The Next Iron Chef, but he was a well-known and well-loved member of the Cleveland food scene long before his Food Network fame.  His restaurants Lola and Lolita revitalized downtown Cleveland, with the new Lola setting the stage for 4th Street to evolve into a hub of the city's nightlife.  Since Andrew and I currently live about 20 minutes outside of Cleveland, we have personally enjoyed 4th Street's vibrant atmosphere and have also had the pleasure of eating at Lola.

Recently, I enjoyed Michael Symon's newest restaurant - B Spot - a burger joint with a twist.  Check out their menu to get the full concept.  This was a fun place for a girls lunch - Ann, Auntie Judy, and I enjoyed a welcome respite from shopping to refuel with some fantastic food.

All the food is a la carte - you order your burger separately from your sides - which worked out great for us, as we could barely finish what we ordered as it was!  Ann, a mushroom lover, opted for the "Shroomage" - a burger piled with portabellas, blue cheese, caramelized onions, and more!  Auntie Judy chose the very safe yet very delicious "Cheeseburger", and I opted for a Cleveland favorite - the "Chili & Cheese Brat".  I'm usually not one for bratwurst, especially piled with stuff, but for some reason, this really appealed to me that day.  Of course, I skipped the roll, as meat on bread is still a no-no for me in most situations.  As it was, I couldn't finish the brat, so I can't imagine what would have happened if I tried to eat the bun! 

We opted to share two sides - the "Lola Fries" and the simple "Chips".  Let me tell you, the parmesan fondue that came with those chips?  I could roll around in it and lick it off myself.  It's that good.  Seriously.  The picture above somehow manages to capture all the food we ate - my brat is in front, the sides are in the middle, "Shroomage" is off to the left, and the Cheeseburger is in the background.

The piece de resistance of this meal was by far the Bad **s Shakes.  Ann drove, and she insisted that Judy and I could get a little tipsy since, after all, it was already 2 in the afternoon and we didn't have to drive anywhere, so why not?  She didn't have to twist our arms too hard - we both got one!  Auntie Judy opted for the Chocolate Banana Marshmallow Shake with Dark Rum.  It tasted like those bananas you wrap in foil with chocolate chips and marshmallows, then stick in the campfire, only WAY better!  We even got that little "char" taste, because the marshmallows were torched so they were toasty.  See?


I opted for the extremely enticing Vanilla Bean Apple Pie Bacon Shake with Bourbon.  That's right people.  Vanilla Bean + Apple Pie + BACON.  I swear, that milkshake gave me super powers.  (Maybe that was the bourbon?)


B-Spot is a fun place to go for lunch - the decor is awesome, the food is fantastic, the service was good, and it's a nice way to experience Mike Symon's vision without paying big bucks at one of his other restarants.

13 January 2010

Rice Pudding


This photo didn't come out that great, but rice pudding is so creamy and so...uncolorful...that it was tough to get a good picture!  What I love about this recipe is that you most likely have all the ingredients in your house - you'll just need to make your husband stop at the store for all that half-and-half!  The original recipe uses whole milk, so I subbed a combination of fat free half-and-half and skim milk.  The results were perfect - a creamy, delicious dessert with a lot less fat! 

I adore rice pudding, love risotto, and cook rice frequently, but for some reason I had never made my own rice pudding before.  I'm glad I tried it - this recipe was a nice change from chocolate at a time of year when people want warm, homey comfort food.  I brought this to my in-laws house for dinner along with some poached pears I had left over from Christmas.

Ann and I opted to eat it warm, Andrew and his father wanted it cold.  Not sure what this weird boy/girl divergence is all about, but to each their own.


Rice Pudding
adapted from Simply Recipes

4 c. fat free half-and-half
1 c. skim milk
2/3 c. uncooked short-grain white rice
pinch salt
2 eggs
1/2 c. brown sugar
2 tsp. vanilla extract
1/2 tsp. cinnamon
2/3 c. raisins  (optional)


Combine rice, half-and-half, milk, and salt in a heavy-bottomed saucepan and bring to a boil over medium high heat.  Drop the heat to low and simmer 20-25 minutes, until rice is tender.  Keep an eye on the rice, stirring often, or it will stick to the bottom of the pan.

Combine eggs and brown sugar in a medium-sized bowl.  Slowly stir in one tablespoon of the rice mixture at a time (totaling about half a cup) to temper the eggs.

Add the egg mixture to the saucepan, reduce heat to low, and stir for about ten minutes.  Do not allow the mixture to return to a boil.

Remove from heat and stir in vanilla, cinnamon, and raisins, if using.  Serve immediately or chill and serve cold.  Serves 4-6.


Baked Stuffed Pork Chops with Grainy Mustard Mashed Potatoes


I've been trying to use up the contents of my chest freezer - I find that things fall to the bottom and linger there forever, so I have to make a concentrated effort to prevent that from happening.  One of the items that had been languishing in the freezer for a couple months was a package of stuffed pork chops.  There were two chops, stuffed with what looked like Stove-Top (Andrew's favorite!) so I figured I'd make them for Sunday dinner last week.

I started out by searing the chops in my cast iron skillet.  I drizzled a little olive oil, then went 3-4 minutes on each side over medium-high heat.


I opted to make this meal as simple as possible, so I added some small yellow onions that had been quartered and one bunch of asparagus, washed and trimmed, to the pan.  I added two frozen cubes (4 tbsp.) of chicken stock to the pan and put it in the oven for 40 minutes at 350 degrees.  Once it was done, I let it cool for a few minutes, then served with Grainy Mustard Mashed Potatoes.


Grainy Mustard Mashed Potatoes
adapted from Tyler Florence 

4 large baking potatoes, peeled and cubed
2 c. skim milk
1 tsp. dried thyme
1 tsp. dried chopped bay leaves
1/2 tbsp. olive oil
1 tbsp. butter
1 tbsp. grainy mustard
salt & pepper

Combine potatoes, milk, thyme, and bay leaf in a medium saucepan.  Bring to a boil over medium-high heat.  Be careful not to raise the heat too high, as this will scorch the milk.  Boil for 15 minutes, or until the potatoes are fork tender.  Add olive oil, butter, and mustard to the pot.

Beat with an electric mixer until potatoes are fluffy.  Add salt and pepper to taste.

I halved Tyler's recipe so it would serve 2-3 people instead of 4-6.  Honestly, Andrew and I each ate a heaping serving, I ate one serving for lunch the next day, and I froze two large servings for another time.  So I really got more like 5 servings out of this "half" recipe.  The mustard mashies went well with the pork and were a welcome change from plain mashed potatoes. 


This simple Sunday dinner was a delicious meal to end one week and start a new one.  I can't believe we're almost halfway through January already - I hope your 2010 is off to a great start!


10 January 2010

Chicken Piccata


Chicken Piccata is an Italian restaurant staple.  A buttery, lemony sauce with capers, a thin piece of chicken, served with pasta...what could be bad about that?  The problem for me is, most restaurants use way too much lemon in their Chicken Piccata.  I'm not a fan of lemon in food, mostly because people tend to overuse it, overwhelming their dishes with tartness. 

Have I turned you off of the idea of Chicken Piccata yet?  I hope not, because done right, this dish is a delicious meal to serve the next time you have guests for dinner.  I used Giada's recipe, but dialed back the lemon juice just a hair.  My version below shows my changes.  I purchased "chicken breast filets" at my farmer's market - already butterflied, cut in half, and pounded thin.  Talk about eliminating the legwork!  Of course, you pay extra to have the work done for you, but the way I see it, I paid about $10 for meat that fed 4 people with 2 servings of leftovers.  So $10 / 6 servings = $1.67 per serving.  Not bad, huh?


Chicken Piccata
adapted from Giada DeLaurentiis 

2 boneless skinless chicken breasts, butterflied, cut in half, pounded thin
2/3 c. AP flour, for dredging
salt & pepper
8 tbsp. unsalted butter
6 tbsp. olive oil
1/4 c. + 2 tbsp. lemon juice
2/3 c. chicken stock
1/4 c. brined capers, rinsed
1/3 c. fresh parsley, chopped
1 lb. capellini pasta
garlic powder
Italian seasoning


Set oven to "warm" or "100 degree" setting.

Season chicken with salt and pepper.  Dredge in flour, coating both sides, then shaking off excess flour.

In a large saucepan, melt 2 tbsp. of butter with 3 tbsp. olive oil.  When butter is sizzling, add two pieces of chicken to the pan.  I was only able to cook one piece at a time, so I sauteed two chicken breasts in this time.  Cook the chicken 3 minutes on each side, then remove to an oven-proof serving plate and put in the oven to keep warm.  Repeat with the second piece if necessary.

Add 2 tbsp. of butter and 2 tbsp. of olive oil.  When butter is sizzling, add two piece of chicken to pan (or one at a time again, if necessary).  Cook chicken for three minutes on each side, remove to serving plate and keep warm in the oven.

Add the lemon juice, stock, and capers to the pan to deglaze.  Scrape up all the yummy brown bits with a wooden spoon, then add 2 tbsp. butter and whisk vigorously. 


In the meantime, boil a large pot of water over high heat.  Add 1 tbsp. olive oil and a generous sprinkle of kosher salt.  Cook capellini according to package directions.  Drain and return to pot.  Add butter, stir to coat.  Season to taste with garlic powder and Italian seasoning.

Make a "bed" of pasta on a plate.  Top with chicken and spoon sauce over the top.  Garnish with fresh parsley.


09 January 2010

These Are a Few of My Favorite Things!

Julie Andrews might have been happy with doorbells and sleighbells and schnitzel with noodles, but me, I like food.  And things having to do with food.  I got a bunch of great foodie Christmas gifts this year, some that I asked for, some that were surprises, and I wanted to share my haul with the blogosphere.

A staple in my family is panettone, an Italian bread/cake that's made with dried fruits.  If you buy it in the grocery store or at a department store, you often pay upwards of $8 a loaf for it.  But if you buy it at the Christmas Tree Shops, you can get it for half that price...which of course, means you can get two!


My sister Jenna picked out a beautiful granite cutting board for Andrew and I.  It's found a place of honor next to the stove, and I love that I can quickly chop ingredients, rest a hot pot or a dirty spoon, or toss a steaming hot noodle on it to cool quickly. 


Andrew got me two awesome Silpats, fresh from France (well, via Amazon)!  I am so excited to use them for baking - talk about a great gift!  Nonnie found Madagascar vanilla beans - I was on the last one of my stash, so that was perfect timing!


Here's a collection of some of my other favorite gifts.  The white bottle with the yellow label is Lemon Verbena Sugar from the Village Herb Shop.  I'm looking forward to making sugar cookies with lemon zest and this sugar in them.  The gold labeled bottle (sorry about that crazy reflection, by the way!) is full of whole nutmegs that Nonnie and my mom found for my stocking.  You can see those vanilla bean vials again - hey, I'm pretty psyched about them, you can't blame me for posting two photos, can you? 

The "herb-savor" is a great product that I spotted in Real Simple magazine.  You can buy it from prepara - Ann got one for me and one for herself because she thought it was so cool.  She was right - it rocks!  It's an upright container that fits into a base which has a water well.  You change out the water the way you would with fresh flowers, and it keeps your herbs fresh, watered, and protected.  I've been storing flat leaf parsley in it; so far we're at seven days, and it still looks as fresh as the day I brought it home.


Though this isn't truly a "foodie" gift, I was thrilled to receive these stacking bins from SunCast (looks like Home Depot has the best price right now).  I love that you can open each bin while they're stacked on top of one another, and the bright primary colors are cheerful and fun.  Ann got these for us and we put them to use immediately.  Our town doesn't do pick-up recycling, but having grown up in the Northeast, recycling is a no-brainer for us.  We save our recyclables and bring them to a recycling center every few weeks, so this is a great way to keep them organized.


Since this post is titled "My Favorite Things", I feel the need to add a couple pet photos.

Finn reminds you to bundle up - we do live in the Snow Belt, after all!


And Evin says, "take these ornaments down, it's JANUARY!"


Did you get foodie gifts for the holidays?  What was your favorite new "toy"?  Anything still on your wish list?